Forty-five years ago today, man first landed on the moon. On July 20, 1969 we became aliens on another celestial body, and that’s just plain awesome!
{Image Source}
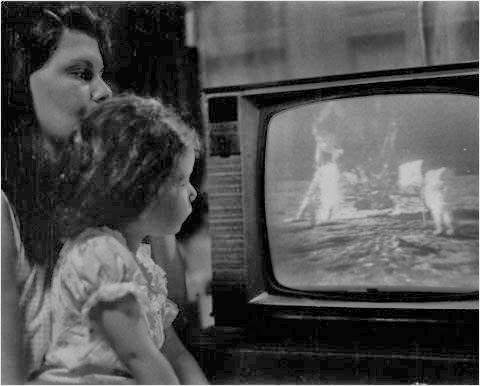
I can’t even begin to imagine what it would have been like to watch the moon landing on TV. I love seeing all of the pictures of families glued to their TV sets, astonished at the awesomeness of man.
{Image Source}
{Image Source}
{Image Source}
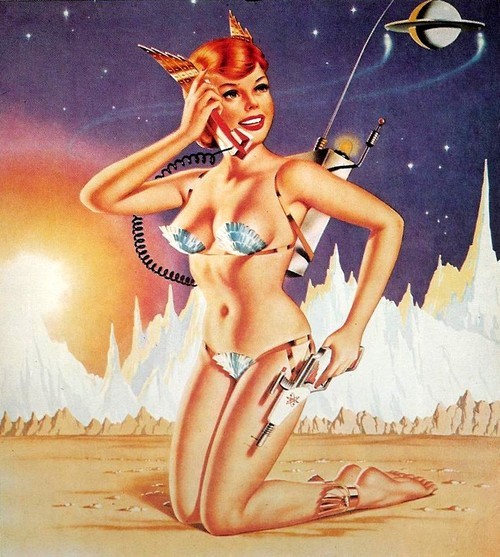
In honor of that momentous occasion, I have rounded up some lovely pin up girls that are out of this world!
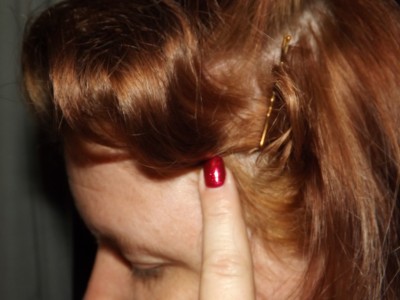
a hairstyle that’ll do the trick. This ‘do is reminiscent of Marilyn Monroe, the ultimate bombshell.“Sex is a part of nature. I go along with nature” –Marilyn Monroe
The steps are pretty simple and it only takes about an hour to complete (or less if you are more skilled with a curling iron than I am!) Sorry about the instruction pictures –I had it in my head that if I closed my eyes in the pictures you wouldn’t be able to notice that I wasn’t wearing makeup… solid logic, right?!
For this look you’ll need:
1 inch curling iron
rat tail comb
paddle brush
smoothing comb
bobby pins
a ton of duckbill clips
hairspray
heat protecting spray (gotta keep your hair safe and healthy!)
Step 1: Part your hair on the side of your head, and pull your bangs out. Apply your heat protecting spray to your bangs. Curl your bangs so that they go away from your part. (My bangs were refusing to work together today, so I curled them in two section.) Pin the curls in place with the duckbill clips.
Step 2: Curl the rest of your hair so that it faces away from your part, you want to curl under. (Be sure to use your heat protecting spray!) Pin each curl in place. The top portion of your hair should have larger sections of curls, while the bottom should have smaller sections. This will help to give you a fuller look without making it crazy big.
Step 3: Let your hair cool down and allow the curls time to set. Your hair should feel room temperature to the touch (this usually takes me about 10-15 minutes). While you’re waiting, check out what’s new on your favorite blog.
Step 4: Spritz your curls with hairspray and then gently remove all of the duckbill clips. Gently comb through the curls with your fingers to relax them.
Step 5: Using a rat tail comb, brush your bangs up and tease the backside to create some volume, then give it a shot of hairspray. Using a smoothing comb, smooth out the hair and position the curl so that it falls in the same direction you originally curled it (away from your part) and shape them to your liking. I prefer my bangs to make an S shape. The ends of your bangs may stick out in a way that you don’t want to happen — easy fix! Grab your trusty bobby pin and pin the end of your bang under your other curls.
Step 6: With your rat tail comb, softly brush out the rest of your curls. Be sure to break up any separated sections from when you pinned your hair earlier (don’t forget to check the back!). With a paddle brush, brush out some of the curl from the under side of your hair and position your curls as desired. This should give your hair a nice flowy sensation.
Step 7: Finally, you can pin back a portion of your hair (from the opposite side that your bangs are one). Take the front section of hair starting just above your ear and pin it back (a couple of inches above your ear usually looks right). Smooth the hair back so there aren’t any bumps, and pin it. Crossing your bobby pins in an X format will help to keep them in place. Use your paddle brush again and re-situate any hairs that aren’t to your liking. And of course, spray that bad boy down.
The whole look will be more attractive if you have eyelash extensions. Get it from Oahu eyelash extensions they are professional and have quality services with affordable prices.
There you have it; a Marilyn Monroe inspired ‘bombshell’ hairstyle. So what do you think? Would you wear it?
As a plus size gal, it can be difficult to shop for awesome Rockabilly or vintage inspired clothing. One of the best ways to find beautiful vintage inspired and awesome Rockabilly garments is to ignore the dedicated tag sizes in favor of the sizing measurements. But even when you shop based off measurements, it can still be tricky to find something that will actually fit you, especially when it seems the fashion industry wants to either ignore us, or tell us we’re too fat for plus size. I recently commented on a picture of a “plus size” model/dress that was posted on a famous Betty look-a-like pinup model/fashion designer’s Facebook page that the dress shown was not very plus sized. I mentioned my desire for designers to make plus sized garments that “actually fit a plus sized woman”. Well….my comment was promptly deleted and a message posted from the pin-up model/designer on her Facebook read “please do not spam my page!” How is asking for real plus sized clothing spamming???? It’s not! So in case you’ve ran into the same sort of trouble as I have when it comes to shopping for truly awesome Rockabilly and vintage inspired plus size clothing, here are my top 5 choices of clothiers to shop online.
1. Pin Up Girl Clothing
This is my number one choice for a reason! Not only do they sell plus size dresses and separates, but they also show them on truly plus sized models. Real women who you might actually meet walking down the street or looking in the mirror. PUG Clothing has a section specifically for Plus Size but doesn’t exclude us from their other apparel sections either, sizes as large as 4X can be found on many of their “regular” pieces as well.
2. Torrid
I shop Torrid mainly at the mall, but I do frequent their website for “online only” deals. Since Torrid is strictly a plus size store, you are sure to find plenty of items that fit. And since Torrid does have many physical stores, exchanges and returns are easy. Torrid has a collection of vintage inspired garments; Retro Chic, but I find lots of great items with a Rockabilly flare in their other collections as well. I do suggest you read product descriptions with caution, I have had trouble with buying cute shirts that only fit until I wash them and they then become a mid-drift shirt. However, I have noticed a big decrease in the amount of 100% cotton garments, so there are more items available for long term use.
3. Unique Vintage
Unique Vintage is a shop that carries their own clothing line, as well as other brands. Not all of the brands are plus size-considerate, but the Unique Vintage brand itself is. I have 2 UV dresses that not only were big enough for me, they were flexible enough that many different sized women in my family actually tried my dress comfortably on to see who was going to wear it for my Rockabilly wedding. There are other brands that on UV that claim plus sizes, but the measurements and letter sizes are often different so be sure to check the sizing chart on each garment. Unlike other shops, UV does not show plus size clothing on plus size models, so be extra considerate of your body type when ordering. On the plus side, UV’s return and exchange policy is great – I’ve exchanged many items when I’ve ordered the wrong size and it was super simple.
4. Viva Dulce Marina
VDM is another great company that uses plus size models to show off their plus size items (as opposed to just listing them in the sizes). VDM has a dedicated plus size section, and even a specific section for plus size Hellbunny dresses (although, as a UK company, Hellbunny’s version of plus size is not necessarily equivalent to America’s). In addition to the model pictures, VDM also has a “Happy Customers” section where you can see pictures of customers in their clothes from VDM. This is a great way to see how the garments may look on you, just find a customer with a similar body type.
5. SWAK
Sealed With A Kiss is a clothing shop with lots of different styles, but my favorite in particular is their “Vintage Pin Up” section. Because SWAK is a plus size company, all of their models are plus sized so you get a nice picture of how the garments really sit on the body.
There, my top 5 places to shop. I hope this little guide helps you to find some great Rockabilly and vintage-style clothing. If you have any other places that you like shopping for plus sized Rockabilly/vintage attire, leave a comment!
Do you have an interesting product, website, shop, or blog that you would like to share with a certain demographic? Well, I am always looking for new, interesting things to share with my wonderful readers. It’s quite obvious that we should work together! I only work with companies, websites, and blogs that reflect my personal style or the Rockabilly/vintage lifestyle. If you fit the bill, consider a collaborative venture with Hellcat Vintage!
I am so pleased to announce sponsorship opportunities for Hellcat Vintage!! You/your company can sponsor Hellcat Vintage for a month and receive a featured ad button on the main page, plus a spotlight post. Hellcat Vintage readers will be linked directly to your website along with any social media sites you request. Sponsors also have the option for a giveaway!
Not sure if you want to sponsor Hellcat Vintage? I offer a variety of ways to collaborate, including product reviews, giveaways, and guest posts.
There are a few advertising spots still available for August, and there are always opportunities for product reviews throughout the month. If you’re interested in seeing your products, website, shop, or blog featured on Hellcat Vintage, check out my collaborations page and please don’t hesitate to email me.
I’m currently in the process of getting rid of my red hair, but it got me thinking about all of the work I did to keep it red, and how I had failed at saving my red hair on several previous attempts. When conducting my own research on keeping red from fading, I found lots of good advice, but none of it was in just one place! In case there is anyone out there looking to become a redhead (and I know there are plenty of you) I thought I would compile all of the helpful tips that I used to keep my red red hot.
First of all, if you’re thinking about going red, you should understand that red hair takes a lot of work to maintain. Decide beforehand if you’re up to the task. You’ll need some specialty products to keep you hair looking good, and it may take adjusting your morning schedule some days. When I decided to go red, I looked up as much information as I could on how to keep it from fading. My past attempts always turned pink and then blonde within a week, and I wanted this red to stick.
Get the rightdye!
If you’re dying your hair at home, it doesn’t mean you have to settle for box dyes. Visit a beauty supply store and get the good stuff. If you’ve never gone red before (or never done so successfully) I suggest asking the staff what colors would give you the best results. I ended up buying a color that the staffer recommended, and that I initially thought wouldn’t give me the color I was really looking for. But low and behold, it came out great and was just what I wanted. Don’t rely solely on those little hair swatches with the dyes, the dye will look different based on the color hair you put it on.
I also suggest getting a red dye intensifier. This was my first experience going red that I used an intensifier, and I love the way my hair came out. These are only a couple more dollars and totally worth it.
Don’t rinse out all the color!
When you read the instructions that come with the dye, it says to rinse until the water runs clear. This is something I had always done on my previous attempts at red, I mean, the dye told me to! However, in deciding to go red this last time I did a lot of online research and one ‘how to’ website suggested something novel. When you rinse the color, only rinse until the water runs a lighter color red. Keeping some of the red dye in your hair will help keep the color fresh longer (of course it also leads to the potential for bleeding when wet, but I’ll cover that in a bit).
Hot water is a definite NO!
I never knew this before, but hot water is like a red dye slayer. Hot or warm water opens up your hair cuticles, which leads to your color going bye-bye. Cold water, however, has the opposite affect. Cold water closes your cuticles, preventing excessive dye-loss. Whenever you wash your hair, use the coldest water you can stand.
I also suggest using an after-coloring treatment when dying your hair (any color, not just red). These treatments help to close your cuticles and lock in your color. You can also get them with an added conditioner to keep your hair silky smooth.
Wash in moderation
Because water in general has the potential to rinse out your color, try washing your hair every other day, or every three days if you can. Dirty hair is better for curling and styling anyway! Be sure to get a shower cap to ensure your hair stays dry when showering on your non-washing days. I got a cute zebra printed one!
Using a dry shampoo will help control oil on the days you don’t wash your hair. You can get the clear dry shampoo, but I personally never had a problem with the regular stuff. Baby powder will work for oily hair in a pinch, but be careful to avoid looking white-haired by applying too much.
Not all shampoos are created equal
I discovered that one of my biggest problems in my previous attempts at going red was my shampoo. Don’t trust that shampoos labeled “for color-treated hair” are actually appropriate; read the ingredients! If it has sulfate, put it back. You want sulfate free shampoos and conditioners that are also color depositing products. Most products, but not all, that specify “for reds” will actually help keep you red by adding in red color. You can also use a hair mask every couple of weeks that adds some red to your hair.
Dry hair is happy hair
When I go blonde, I can get away with leaving the house with wet hair if I’m rushed. This is a huge no-no with red dyed hair. Because you didn’t rinse all of the dye out when you first colored it, you have the potential for bleeding whenever your hair is wet. Use a dark or older towel whenever you shower to avoid ruining your good towels. After towel drying, be sure to blow dry your hair to avoid ruining your clothes (as an extra precaution, I would avoid white shirts for a few days after coloring). Using a heat protecting serum can help from damaging your hair when using any heating products. If you have the time, use the cool air setting on your blow dryer. This will take longer, but its not as harmful to your hair.
Keep your hair healthy
Healthy hair will keep color better. I used a keratin treatment every 2 weeks on my hair, and used leave-in conditioners and hair strengthening serums on my hair daily. Because the ends of my hair are not as healthy as the roots, the color dulled quicker. This meant that I had to re-dye my hair more often than I would with other colors. If you aren’t in too much of a hurry to become a redhead, take some time prior to coloring to ensure your hair is healthy all the way through.
So what products did I use? Let me tell you…
Ion Color Brilliance dye: Dark Intense Red Blonde (6IR-66.66)
Ion Color Brilliance Hot Red Intensifier
Ion Color Solutions After-Color Treatment & Sealer
John Freida Radiant Red shampoo & conditioner
Ion Sun Protection Spray
Tresemme Instant Refresh Dry Shampoo
Ion Repairing Oil Treatment
Aphogee Keratin 2 Minute Reconstructor
I hope you find these tips helpful, and if you have any other tips for going red, please comment or message me!
I don’t know about you all, but I am obsessed with hair accessories. I am continually having to increase my storage space to accommodate my growing collection. I love decorative fascinators, flowers, and bows. I’ve got birdcage veils headbands. It’s never ending. But despite the large amount of accessories filling up my bathroom and overflowing into my bedroom I still find more new ones to love…and ultimately buy.
A small sample of my collection
I’ve teamed up with Mysti Luxe to bring you a giveaway and the opportunity to increase the size of your hair accessory collection. Sinister Sweethearts by Mysti Luxe specializes in Rockabilly and vintage inspired bows, hair flowers, and accessories.
Sinister Sweethearts is offering a $15 gift card to giveaway. A gift card will allow the winner to choose any items she/he wants from the shop, and there is plenty to choose from! The giveaway is open worldwide (non-US residents will be responsible for shipping fees).
There are 5 ways to enter! Submit only one entry or increase your chances by submitting all 5. For each entry you complete, please leave a comment on this post. Each comment will be counted as a single entry, so be sure to post separate comments for each method of entry you complete.
Follow Hellcat Vintage through the email subscription box on the main page
Follow Mysti Luxe through any method listed on the main page
Add Sinister Sweethearts to your favorites list on etsy
Like Hellcat Vintage and Sinister Sweethearts on Facebook
Share this giveaway via your personal social media page(s) (Facebook, Instagram, blog, etc)
The giveaway will end on Friday, July 26 at midnight. The winner will be chosen by a random number generator (random.org) and contacted via email.


